
Chapter 4 Configuring Web Servers and Web sites
This section provides a detailed explanation for setting up an NSAPI server to run with PowerDynamo. The required steps include:
The system path is automatically edited and the Application Server installed as part of the PowerDynamo installation procedure. These steps are not necessary if you configured the Web server during installation. You must still create an ODBC System Data Source Name, create a connection profile, and configure the Application Server.
For more information, see "Configuring Web servers during installation".
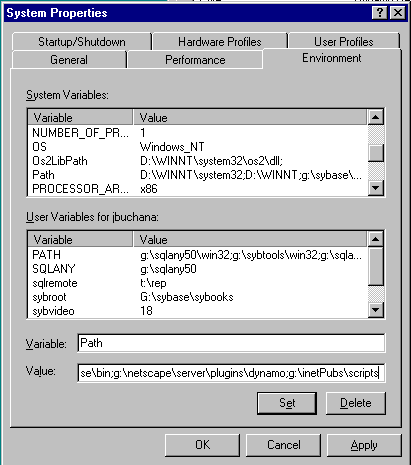
In Step two of Configuring an NSAPI Server, you will be copying DLLs to the Netscape\server\plugins\dynamo directory of the NSAPI Web server (you will have to create the dynamo directory). For the server to find these DLLs, you must edit your computer's system path to include the directory containing the DLLs.
![]() The DLL directory must be added to the
system path, not the user path. NSAPI servers are run as Windows
NT services from an NT operating system.
The DLL directory must be added to the
system path, not the user path. NSAPI servers are run as Windows
NT services from an NT operating system.

If you haven't done so already, install PowerDynamo onto the Web server machine using the standard software installation. This provides you with tools such as Sybase Central and the Dynamo Configuration folder that are necessary in later stages of the configuration.
The PowerDynamo Application Server for NSAPI Web servers includes the following files, which are loaded during installation:
The following Powersoft Power++ runtime libraries are installed into your Windows SYSTEM directory or your Windows NT system32 directory:
Netscape Web servers use the NSAPI interface to communicate with the Dynamo Application Server.
For full details on configuring Netscape servers, see your Web server documentation.
![]() To configure Netscape Web servers for use with
Dynamo:
To configure Netscape Web servers for use with
Dynamo:
Init fn=load-modules shlib=path/dy2ns03.dll funcs="_dynamo_ntrans,_dynamo_fn,_dynamo_pathcheck,
_dynamo_init"

Init fn=_dynamo_init
path
is
where the filter DLL can be found. For example,
Shlib=c:/netscape/server/plugins/dynamo
NameTrans fn=_dynamo_ntrans
PathCheck fn=_dynamo_pathcheck
<Object name=PowerDynamo>
Service fn=_dynamo_fn
</Object>
The following is a sample configuration file. Some long lines are wrapped for display reasons. Each separate line in the file is separated by a blank line in this listing.
# Use only forward slashes in pathnames

# backslashes can cause

# problems.

Init fn=flex-init access="c:/Netscape/Server/
https-steverd/logs/access" format.access=
"%Ses->client.ip% - %Req->vars.auth-user% [%SYSDATE%] \"%Req->reqpb.clf-request%\" %Req->
srvhdrs.clf-status% %Req->srvhdrs.content-length%"

Init fn=load-types mime-types=mime.types

Init fn=load-modules shlib=c:/Netscape/Server/Plugins/dynamo/dy2ns03.dll funcs="_dynamo_ntrans,_dynamo_fn,_dynamo_pathcheck,
_dynamo_init"

Init fn=_dynamo_init

<Object name=default>

NameTrans fn=_dynamo_ntrans

NameTrans fn=pfx2dir from=/ns-icons dir="c:/Netscape/Server/ns-icons"

NameTrans fn=pfx2dir from=/mc-icons dir="c:/Netscape/Server/ns-icons"

NameTrans fn=document-root root="c:/Netscape/Server/docs"

PathCheck fn=_dynamo_pathcheck

PathCheck fn=nt-uri-clean

PathCheck fn=find-pathinfo

PathCheck fn=find-index index-names="index.html,home.html"

ObjectType fn=type-by-extension

ObjectType fn=force-type type=text/plain

Service method=(GET|HEAD) type=
magnus-internal/imagemap fn=imagemap

Service method=(GET|HEAD) type=
magnus-internal/directory fn=index-common

Service method=(GET|HEAD) type=*~magnus-internal/* fn=send-file

AddLog fn=flex-log name="access"

</Object>

<Object name=cgi>

ObjectType fn=force-type type=magnus-internal/cgi

Service fn=send-cgi

</Object>

<Object name=PowerDynamo>

Service fn=_dynamo_fn

</Object>
A document named test.stm in the Dynamo Web site folder would then have the following URL:
http://server-name/Site/test.stm
The URL contains the server name, followed by the URL prefix defined in the Application Server mapping: in this case /Site. This mode of addressing is exactly the same as for the Personal Web Server.
Creating a System DSN is the same as creating a DSN except a System DSN is available to all users on a machine as well as services.
![]() Note
If you are connecting to a file-based Web site, or using an
Open Client connection, this step is not necessary. If you are using
Windows 95, create a data source; you do not need a system DSN.
Note
If you are connecting to a file-based Web site, or using an
Open Client connection, this step is not necessary. If you are using
Windows 95, create a data source; you do not need a system DSN.
![]() To create an ODBC System Data Source Name:
To create an ODBC System Data Source Name:
Creating an ODBC data source to connect
to an Adaptive Server Enterprise database
When you are creating an ODBC data
source for an Adaptive Server Enterprise database the Select Method
must be set to 0 - Cursor for Dynamo to work. The Select method
setting is located within the ODBC Administrator | ODBC Sybase
Driver Setup | Performance Tab
![]() To ensure that the ODBC data source is available:
To ensure that the ODBC data source is available:
You should create a connection profile for your Web site to store connection information in the registry in encrypted form. This information is used by Sybase Central, the Personal Web Server, and the Dynamo Application Servers.
Note
If you are connecting to a file-based
Web site, or using an Open Client connection, see "Creating a connection profile for your Web site".
![]() To create an ODBC connection profile for your
Web site:
To create an ODBC connection profile for your
Web site:
Once the site Web server receives an URL from a Web client, it passes it to the Dynamo Application Server, which locates and processes the document. You must add a mapping to the Application Server so it can locate the document. Use the Configuration folder found within the Utilities folder of Sybase Central to add a mapping to the Application Server.
![]() To add a new mapping using the Dynamo Configuration
folder:
To add a new mapping using the Dynamo Configuration
folder:
For a more detailed description of how to configure the Dynamo sites using Sybase Central and the Configuration folder, see "Configuring Web sites".
| Copyright © 2001 Sybase, Inc. All rights reserved. |

| |